The automated backup tool in QuickBooks backs up the important QuickBooks files on a regular basis. By making use of the functionality, users can schedule the backup so that QuickBooks backs up the data even if the user forgets to back up. Backing up essential data becomes important as this makes sure that all the essential data related to QuickBooks remains safe.
However, the scheduled backup feature also faces several issues and is often interrupted by the error message stating, “QuickBooks scheduled backup is not working.”
QuickBooks Scheduled Backup is not working: Major causes behind the error
Before heading for the troubleshooting solutions, it is advised that you go through the various causes of this QuickBooks error. Some of the major ones are listed below:
- QuickBooks is configured to run on a different Windows version.
- Incorrect scheduling of backups in QuickBooks.
- Another reason automatic backup stops working is the out-of-date QuickBooks Desktop application.
- Errors in QuickBooks automatic backup schedule are also caused by damage to the company file.
Effective solutions to tackle QuickBooks scheduled backup is not working issue
The solutions provided below should be helpful for users in resolving this annoying backup-related QuickBooks error.
Solution 1: Setting up QuickBooks Updates
Due to its complex algorithmic framework, QuickBooks Desktop is marred by technical errors. As a remedial measure, Intuit comes up with regular updates for tackling such errors. It is, therefore, recommended that users of QuickBooks update the accounting software to the latest release.
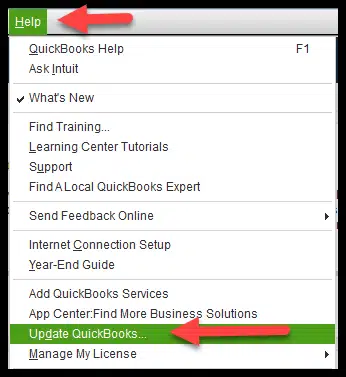
- To continue with the update procedure, go to the Help tab and choose the Update QuickBooks Desktop option.
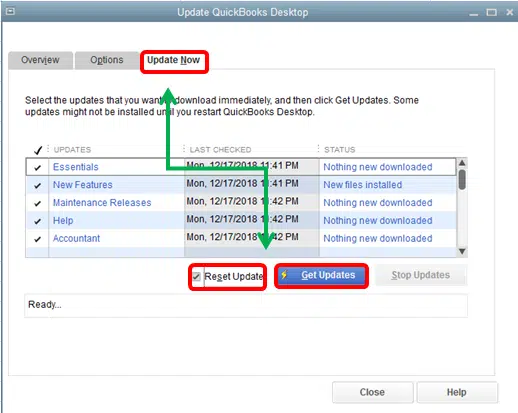
- Go to the Update Now tab now, and then choose the Get Updates option. This will cause QuickBooks to download all of the updates that are currently available.
- Restart QuickBooks and select Apply Update when requested to install the updates.
- Check if the automatic backup setup is functioning by trying again.
Solution 2: Using the Verify and Rebuild Utility in QuickBooks
Any damage caused to the QuickBooks company files can be dealt with by using the verify and rebuild tool, an integral feature of QuickBooks. By using this tool, the issues related to scheduled backups can also be rectified. The steps given below will make things easier for you.
- Kick start the process by launching QuickBooks Desktop and then hover the mouse over the utility option available under the File tab.
- Thereafter, pick the option for Verify Data.
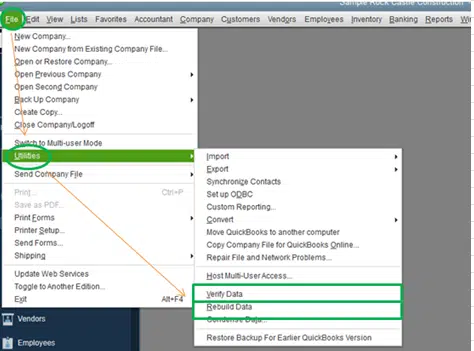
- Now, QuickBooks will check the company file for corruption or damage.
- If QuickBooks displays “Your Data has Lost Integrity,” then click on the File tab once again after closing the message.

- Now, pick the Rebuild Data option under the Utilities tab.
- Take a backup of your company file data on your desktop by clicking OK in the Backup Company Data popup box, and then start off with the rebuild process.
- The QuickBooks Rebuild Data tool will fix the company file damage when you click OK.
- Finally, click on OK and try scheduling the automatic backups again after you see the notice “Rebuild has completed.”
Solution 3: Running QuickBooks as an admin
At times, insufficient admin privileges do play a contributory role in inciting the QuickBooks scheduled backup is not working issue. To bypass this, you should make sure to run the QuickBooks accounting software as an admin. The procedure for the same is given as follows:
- Click Properties after right-clicking the QuickBooks icon on your desktop.
- Check the box next to Run this program in compatibility mode for in the QuickBooks properties dialogue box. Next, choose Windows 10 from the drop-down menu.
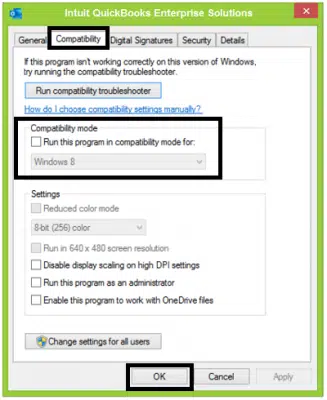
- After that, check the box that states, “Run this software as an administrator.”
- After selecting Apply, finally hit on Ok.
Solution 4: Using the Compatibility Mode to run QuickBooks
You should first open the Run command box by pressing the Windows + R keys on your keyboard. After that, enter the “winver” command, and your computer will display the version of Windows that is currently installed. The Windows version you are using will be shown in the popup window that says “About Windows.”
- You now need to head to Properties after right-clicking the QuickBooks icon on the desktop.
- Within properties, make sure to checkmark the Run this program in compatibility mode checkbox on the Compatibility tab.
- Now, opt for the Windows version you are using by clicking the drop-down menu.
- After clicking Apply, you need to click on OK.
- If QuickBooks scheduled backup tool is still not functioning, make use of the QuickBooks Clean Install Tool to reinstall the QuickBooks Desktop application.
You may also read: Resolutions To Fix QuickBooks Error Code 6177
Having gone through the various methods of fixing QuickBooks scheduled backup is not working issue, our team of QuickBooks professionals expects that the issue should be resolved by now. If the error still keeps hindering your accounting operations, then contact our QuickBooks enterprise support team via our helpline i.e., 1-800-761-1787 for more help.
