Sometimes, metal pipes can corrode or develop a leak. There is no shame in admitting your pipes are rusty and in need of some attention. After all, rusty pipes can cause serious problems.
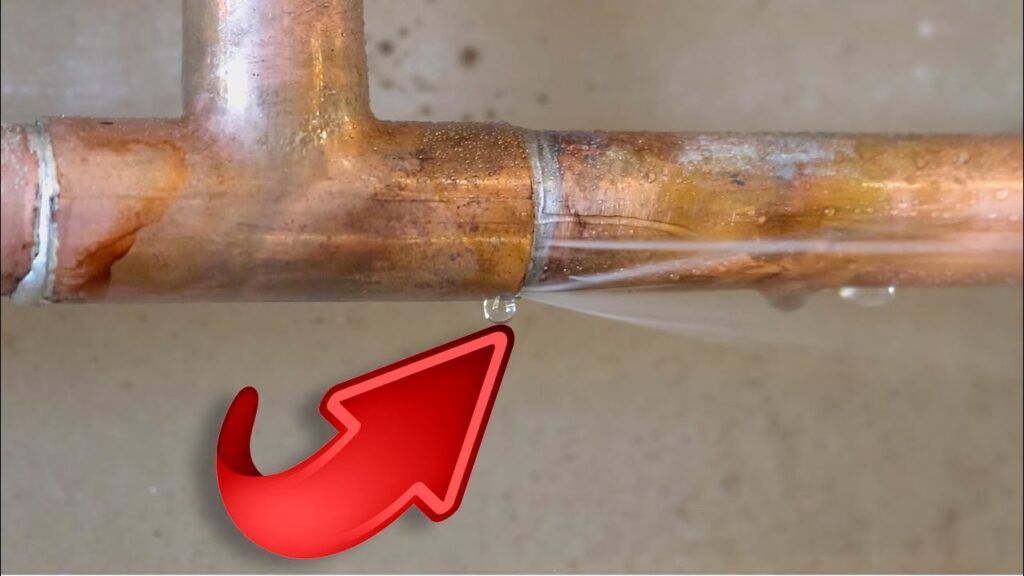
Unless you know what you are doing, repairing a leaky copper pipe is something of a challenge. The biggest problem is finding the leak. Many leaks are very small, so you need to know where to look. Also, you need to know where to look at the right time.
In this post, we’re going to take a look at how to fix leaky copper pipe with a little solder.
1. Turn off the water to the pipe
If you are experiencing water leakage from your copper pipe, there are a few things you can do to fix the problem. First, turn off the water to the affected pipe by turning the main valve in your home or office building. Next, use a pair of pliers to grip one end of the leaking pipe and twist it shut until it snaps. Finally, use some solder to seal the joint between the old and new pipes.
2. Cut out the damaged section of pipe with a pipe cutter
Leaky copper pipes can cause a lot of problems, from water damage to costly repairs. To fix the pipe, start by cutting out the damaged section with a pipe cutter. Make sure to use a sharp blade and hold the pipe steady while you cut; otherwise, you could end up damaging the rest of the pipe as well.
Once you’ve removed the damaged section, solder it back together using regular household solder. Be sure to wear gloves and eye protection when soldering, and keep an eye on the heat so that you don’t melt any parts of the pipe that you didn’t intend to. If all goes well, your repaired copper pipe should be leak-free once again! If you can’t do it yourself then hire a professional plumber using this link: Rørlegger Årnes.
3. Clean the ends of the pipe with a wire brush
Leaky copper pipes are a common problem, and they can be difficult to fix. If the pipe is leaking water or gas, you may not be able to see the damage until it’s too late. In these cases, you may need to clean the ends of the pipe with a wire brush before you can try to repair it.
This will remove any dirt or debris that has built up over time and made the pipe less effective at transferring heat or water. You should also check for any cracks in the pipe itself. If there are any cracks, you will need to seal them off before you can attempt repairs again.
4. Apply flux to the ends of the pipe
Solder is a metal alloy that has been heated to a high temperature and then cooled, which makes it brittle. When you apply solder to copper pipe, the heat of the soldering process causes the solder to flow along the seam where two pieces of copper pipe meet. This flux helps keep the solder in place so it doesn’t seep out and form leaks.
Apply flux by dipping a small amount of it into a pot or pan, coating both ends of the pipe with flux, and then holding one end of the pipe against your work surface while you heat up the other end with your soldering iron. Be sure to use enough heat so that the solder flows freely but isn’t too hot; over-heating can cause cracks in your pipes.
5. Place a solder ring over the end of one of the pipes
Leaky copper pipes can be a major headache, not just because of the water damage they cause, but also because of the health risks that come with breathing in solder fumes. If you catch your pipe before it becomes a serious problem, there are a few things you can do to fix it. One option is to place a solder ring over the end of one of the pipes to prevent it from leaking again. Solder rings are easy to make and require just a little bit of soldering skill. You can also try using sealant tape or caulk to fix small leaks.
However, if the leak is severe or persistent, you may need to replace the entire pipe. In this case, hiring a professional plumber will be your best bet.. Copper piping is an important part of any building’s infrastructure; however, if it’s not maintained properly, it can quickly become damaged and dangerous.
6. Place the two pipes together and heat them with a propane torch
Leaky copper water pipes are a common problem that can quickly lead to costly repairs. To fix the leak, you’ll need to use some solder and place the two pipes together. You can heat them with a propane torch until the solder melts and connects the two pieces of pipe.
Make sure not to get any solder on your skin or clothes, as it will be difficult to remove. Once the connection is made, cool the pipe down so that it’s solidified before continuing with the repair.
7. Apply pressure to the solder ring with a soldering tool
Leaky copper pipe is a common problem that can cause water damage and costly repairs. To fix the leak, first apply pressure to the solder ring with a soldering tool until the ring melts and the two pipes are joined. Then use a plumber’s snake to twist the joint until it becomes tight.
Finally, use a wrench to tighten the connection. This repair will hold for up to six months under normal conditions. If you notice any leaks after making this repair, replace the joint immediately.
8. Allow the joint to cool and turn the water back on.
When repairing a leaky copper pipe, the first step is to allow the joint to cool and turn the water back on. This will help prevent further damage from taking place. Once the joint has cooled, use a pair of pliers to grip one end of the copper pipe and twist it counterclockwise until it breaks free. Next, hold onto the broken end with your other hand and use your solder gun to connect it back together.
Make sure that you flux the joint before you solder it so that any metal corrosion doesn’t cause problems down the road. Finally, wait for the solder to cool and then test for leaks by turning on some water at both ends of the repaired pipe and watching for the water to seep out.
If there are no leaks, congratulations! You’ve just repaired a broken pipe. If you do find leaks, be sure to fix them before continuing.
In conclusion,
Fixing a leaky copper pipe requires some work and patience. However, if you can diagnose the problem correctly and use the right techniques, you can correct the situation and get your copper pipe working again. We hope this post has been informative. Please let us know if you have any additional questions or comments.